Asset Folder Use
You can host your downloadable content, such as white papers, case studies, and brochures in our Asset Manager. No more waiting for your IT or Web team to get a new asset uploaded onto your website, simply upload it to Net-Results on your own.
The advantages to having Net-Results host these files for you are two-fold:
- More reliable tracking – if we’re hosting the file, we definitely know when it is accessed, and by which Contact.
- Better reporting – an entire dashboard is devoted to showing you how many times your Assets were downloaded and by which Contact.
How to Upload an Asset
- Navigate to the Marketing Center -> File Manager
- If this is your first time navigating to the Asset Manager, then you will need to enter the domain that was sent with your DNS records in the Asset Configuration tab. Then navigate to the Asset Manager to add your PDFs. For questions on DNS set up, please contact support@net-results.com
- In the Asset Manager, ensure that the Asset Folder is selected. Then, select the blue upload button in the upper left-hand corner.
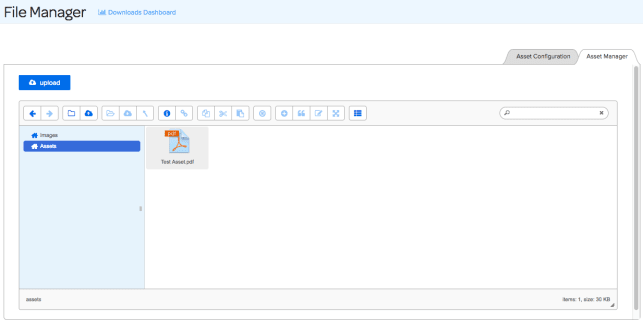
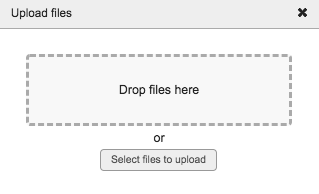
- Upon selecting upload, a window will appear where you can either drag a file or select to find the file on your computer and upload it!
Available Asset Options
Once your Asset is uploaded you are able to leverage it within Net-Results. When you right-click on an asset in the Asset Folder, a menu will appear that has a few available options:
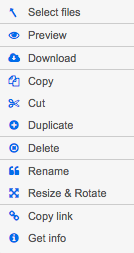
- Select File – select the current file that you are working with.
- Preview – catch a glimpse of the file that you are working with before adding it to an email or landing page.
- Download – download the file to your computer.
- Copy – copy the file.
- Cut – cut the file.
- Duplicate – duplicate the file within the asset folder.
- Delete – remove the file from the asset folder.
- Rename – rename the file within the asset folder.
- Copy Link – Allows you to copy the link path to the asset within the asset folder. This is also the link that you will use on emails and/or landing pages to link to your downloadable content!
- Get Info – Allows you to easily see the size, path, link, dimensions, and last modification date.
Asset Folder FAQ
Q: What is the maximum file size allowed?
A: There is a maximum file size of 512mb on an upload.
Q: What happens when I rename my asset?
A: If an asset is renamed and is being used in an email or landing or anywhere else in the platform, you will need to copy the new link and replace it. The URL is directly tied to the name of the asset.
Q: If I change/replace an asset, do I also need to replace it on my landing page, in my email, etc?
A: Any time an asset is updated it is best practice to update the asset wherever it is being leveraged in the platform. This will ensure that the most up to date information is being presented.
Q: How to segment off did download asset (link to an article on asset reporting?)
A: You are able to leverage the condition “Specific page viewed does match wwww.urlofyourasset.com” in order to Segment off of downloads. For more on Asset Reporting check out our article here.
Check out this video to learn more!