Overview
If you leverage a lot of custom HTML in you email designs, or if your email creative was commissioned by a third party, our Custom HTML Email Builder will allow you to paste in the source code (or create it from scratch). In some cases this is even easier than working with the drag and drop builder and can save you a lot of time.
Creating a Custom HTML Email
To create a new custom HTML email, log into your Net-Results instance and navigate to the Marketing Center -> Emails -> Create New.

You will be presented with the option to create a new Custom HTML email. Selecting this option will open the email builder, where you will see a preview pane and a right-hand menu with the following 3 tabs:
- Email Settings
- HTML Content
- Text Content
Email Settings
The Email Settings tab will allow you to designate key details such as Subject Line, Sender Name, Sender Email, Reply To Address, and UTM content. This is also where you will mark emails as being transactional. Transactional emails refer to non-marketing, action-triggered emails, such as: receipts, password resets, or order confirmations.
In addition to specifying the key send and reply details of your email, you may also specify a specific folder into which the email will be saved.
As with the Drag and Drop Email Builder, you should save your Custom HTML Email as a template if you plan to reuse it in the future.
HTML Content
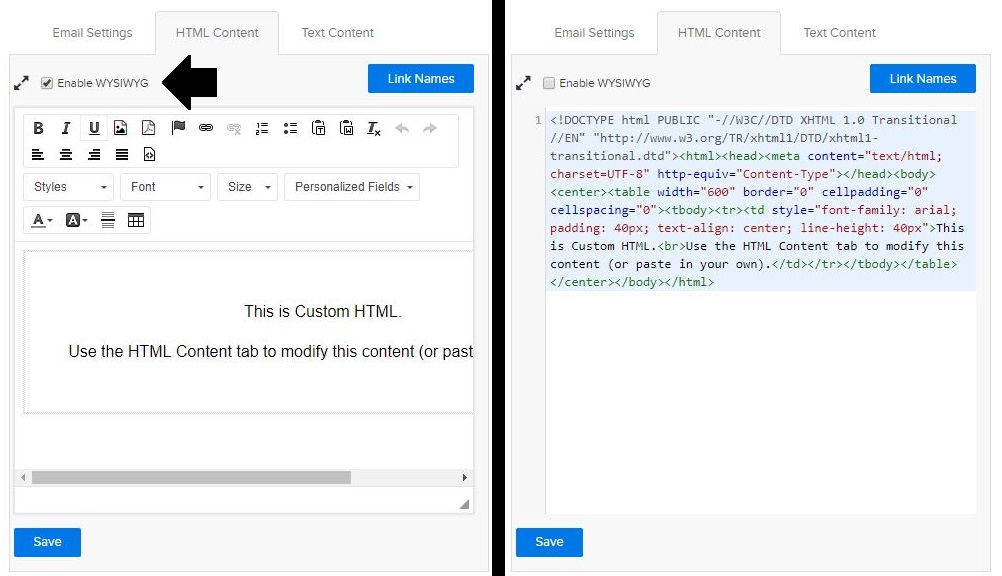
The HTML Content tab is where you can add and update the source code for your Custom HTML email. Changes made here will show up in the Preview pane on the left hand side of the screen.
The HTML Content editor does offer some rich text formatting via a WYSIWYG function.WYSIWYGÂ stands for “What Your See Is What You Get” and refers to the ability to add basic formatting to your email with the click of a button (e.g. B to bold text, and so on.)
When you first open the HTML Content editor you will likely see a checked box that says WYSIWYG Editor Enabled. You will want to uncheck this box before pasting source code into the editor.
Text Content
In some cases, recipients may be unable to view HTML versions of your email. As a best practice, it is always best to have a plain text version of your email, which can be loaded in its place. Recipients of your communications will only receive one or the other, with preference given to the HTML versions of emails.
Note: The Text Content Editor renders content only in plain text. HTML source code will not render in this version of the email. Check out our blog post on tracking plain text emails.
When sending a test email via the Email Builder, you will see 2 check boxes beside the recipient’s name. Check both to receive test versions of both the HTML and Plain Text email options.
Email Requirements
There are a few requirements and things to keep in mind when creating or working within a Custom HTML email template. Whether you’re creating your own email from scratch or working with a vendor, be sure to check off all the following:
- Images and Assets (such as PDFs) leveraged in your email will need to be stored in an accessible location, such as the Net-Results File manager. If the images are not hosted properly, they may not render faithfully upon receipt. The Net-Results File Manager is included in your Net-Results subscription and it is possible to host your images there (as with the Drag and Drop Email Builder). You will just need to ensure that image links point to the correct image location. Alternatively, many online HTML email generators will offer to host your images for an additional cost.
- You will still need to include an unsubscribe link in your email. In order for the link to be recognized as an unsubscribe/opt-out link, it will need to include the following source code:
- <a class=”_ma_unsubscribe” href=”{MA_Unsubscribe}” title=”Click here to unsubscribe.”>Click here to unsubscribe.</a>Â
- You can read more here.
- A postal address for your place of business must also be included. In order for the Email Builder to recognize this required element, it will need to include the following source code:
- <div class=”__ma__postal_address” style=”text-align: center;”> Your Business Postal Address </div>
Best Practices
The following best practices will help you make the most of the Custom HTML Email Builder:
- Avoid including any type of Javascript or Form code. At best these will be stripped out, or displayed as plain text, while at worst they may cause your message to go directly to the spam folder.
- Avoid using <div> tags and <span> tags for alignment. Instead, <table> structures will keep your content rendering faithfully across different mail clients (Outlook vs. Gmail vs. everyone else).
- Avoid pasting pre-formatted content into the editor. This includes content from PDFs, Microsoft Word, or HTML pages. Either paste source code or, if you must paste content, “filter” it through a plain text editor like Notepad to remove any formatting. An easy way to do this is by pasting it into Notepad, then copying it from there and pasting it into the editor.
- HTML5 is a great standard to adhere to. HTML has come a long way and you’ll now find that HTML5 is supported across most major email clients, allowing you to flex your design skills more effectively.
- You can use CSS, but there are a few things to keep in mind. First, know that inline styles are always better for email HTML (there are even tools on the Internet that will convert your style block to inline styles). Go ahead and use classes and id’s. Even things that need to be calculated will work, if you’re making a Responsive Design email. Finally, just be aware that certain mail clients, especially web clients like Gmail, will strip out specs that affect the entire <body> like backgrounds or background images.
- Test how your email renders in as many mail clients as you have access to, or use a service like Email On Acid or Litmus.
- Always validate your HTML (as invalid HTML usually winds up in the spam folder).
