Types Of Email Builders in Net-Results
Net-Results offers two types of email builder: Drag and Drop Email Builder and a Custom HTML Email Builder.
Drag And Drop Email Builder
The Net-Results Drag And Drop Email Builder makes it easy for you to create fantastic looking emails in minutes – with no HTML knowledge required. This builder also lets you create emails that use Responsive Design styling – so you don’t need to worry about how your email will look on a tablet or mobile device.
HTML Email Builder
The Editor Tool Bar allows you to create HTML emails without an understanding of advanced HTML coding. Many of the tools you use in everyday word processing are used in this editor.
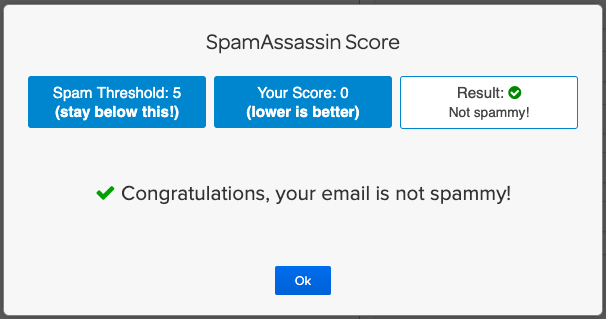
Perform Spam Testing
You can perform a SpamAssassin spam test without even needing to leave the email builder! Simply click the “Is It Spam?” button at the top of your page.
Just make sure your score doesn’t go above a 5 and you’ll put yourself in a good position to avoid those pesky spam blockers.
Anti-Spam Compliance
Unsubscribe messages inside of email footers are common and ubiquitous because CAN-SPAM requires that all marketing messages contain a postal address and a method to unsubscribe. To this end, Net-Results enforces that these are always present on all non-transactional emails. This means if you do not insert them, they are automatically appended to the bottom of your content to ensure this requirement is met.
If you drag a Net-Results Footer Block (which has these required classes built-in) into the canvas of your email we’ve automatically added these classes for you, and you can simply edit the text in the WYSIWYG editor and the default address and unsubscribe links will not be appended.
Read more about testing SPAM in the email builder on our Blog.
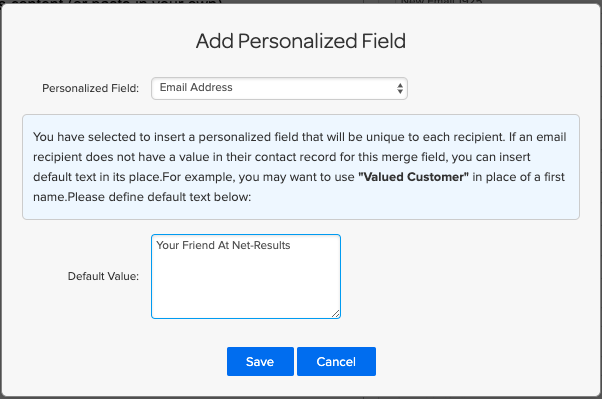
Personalization in Emails
Any Standard or Custom Contact Attribute in Net-Results can be inserted into an Email’s Subject, From Label, and message body by inserting a personalization reference. The easiest way to do this is using the Personalized Fields drop-down while editing a Text element, though you can type it directly into the content if you know the name of the field.
Personalization doesn’t only apply to the message body, either. To personalize the Subject Line, From Label, or Reply-To Address, use this same step then cut and paste the generated text or simply type in the syntax: {FIELD_NAME|default value}.